Sunday, January 30, 2011

Carious: Cranberry Pistachio Biscotti


I have a confession...


I've never eaten a biscotti before.

"THEN WTF YOU DOING, TRYING TO MAKE 1?!"

I hear you say.


Well. I had lotsa cranberry and pistachio left, and I saw a blog entry of biscotti and it looked so yums. So there I went! Lets just say that it'd been better if I had biscotti before. I didn't really know how thick I had to cut it so I had quite a thick slice of brick. Oh well. It softened up a teeny bit the next day and man was it yums..

And best of all, THERE IS NO OIL/BUTTER/LARD/SHORTENING! =D

Talk about lower calorie indulgence. Noms. My mom and sis loved it to bits! Shall work on making these better!

Trivia!

Biscotti literally means twice baked - Bis - cotti. It came from Prato in Italy. Being baked twice, it gets very dry and hard so it can last longer. It is usually dunked into a beverage such as coffee to be eaten.
From Wikipedia of course! =)

Carious warning!
REMEMBER TO FLOSS AND BRUSH YOUR TEETH DAILY PEOPLE! =D Avoid eating dried fruits cause it's super high in sugar and it doesn't have as much vitamins as the fresh ones.

Original Recipe from here!


2/3 cup (135 grams) granulated white sugar
2 large eggs
1 teaspoon pure vanilla extract
1 teaspoon baking powder
1/4 teaspoon salt
1 3/4 cups (245 grams) all-purpose flour
1/2 cup (60 grams) shelled, unsalted pistachios, coarsely chopped
1/2 cup (75 grams) dried cranberries or cherries

Preheat oven to 180deg C. Beat the eggs and sugar until thick and fluffy.


Then, throw in the vanilla, flour and salt and mix with the mixer until combined.


Pour in the cranberries and pistachio and stir it up nicely.


And the ever important finger test. If you don't taste it, the product will fail. Period.


Shape it into a log, about 13 inches long and 7 inches wide? I just smacked it together. Remember to wet your hands or the dough will stick to your hands like a 2 year old kid. Bake it for a full 25 min - 30 min until it starts to brown a little on the top


Remove it from the oven and then cut it into THIN STRIPS diagonally. THIN STRIPS! About 1.5cm strips. I had them at almost 4cm. YIKES. Measure them alright! Then bake them at 160 deg C for another 10 min on each side. It should look slightly toasted. =D
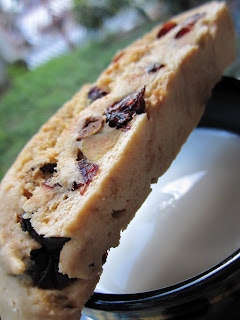


Poured myself a cuppa milk cause I don't take coffee nor tea.. Don't like caffeine and it stains the teeth, although I do still like their taste..

Pressure points and top tips! (from trial and error) =D

1) Eat a biscotti first before making 1. You need to know where to pitch yourself at. Haha.

2) Cut them into thin strips! Biscotti are dry and hard so they gotta be thin thin. Like thin.

3) Don't overbeat the eggs cause they'll lose their fluff and become dense.

4) Ensure that the log is thoroughly cooked before cutting into it. They don't cook again when you baked them the 2nd time at a lower temperature.


Now go make some of these guilt-free yumminess! My mom has already ordered a huge box of these before I go back to Australia. Gonna be a lot of baking in progress.. But hey, no oil/butter/lard/shortening, its totally worth it no?

Monday, January 10, 2011

Carious: My favorite cookies - chocolate chocolate chip cookies


People who know me know my list of loves really well, because I always go hysterical whenever the conversation topic is about them. So it goes - chocolate, durian, grilled mushroom with olive oil and salt.

Oh wait, chocolate, durian, agnes b, grilled mushroom..

No wait, chocolate, durian, telekinesis, agnes b, mushroom...

You get my point.

Any recipe that has more than one "chocolate" is bound to find its way into my list of go-to recipes.


Chocolate chocolate chip cookies. Yum. These cookies are so decadent and so delectable. It takes me great restraint to stop at 1 but I always end up breaking up other cookies into halves or thirds.. =X

I can't describe how divine these cookies are adequately. Soft, chewy, moist, sweet, and with a tinge of salt that tingles the tongue. And all these are just the tip of the ice berg. The whole cookie is just pure magic.

The whole photography session took close to 15minutes because I was, well, you know.....

So apparently there are strict ways in chocolate handling because they are extremely fickle and need a lot of tender loving care. Here are some stuff I've uncovered while combing google!

From here

- Take your time. Dark chocolate can withstand high temperature than milk or white chocolate, but it’s always best to heat chocolate gently.
- Chopping chocolate before melting means the heat will be evenly distributed, and the chocolate will melt quickly with little fuss.
- Be very careful liquid away from melting chocolate. Chocolate is composed of solids suspended in cocoa butter. Melting the chocolate transforms the cocoa butter into liquid, and the solid particles glide easily through this cocoa butter base. But just a few drops of water, or any liquid, will be absorbed by the solids and cause them to cling to each other. When this happens, the chocolate seizes, or becomes stiff and difficult to stir. Once chocolate has seized, your only option is to add more liquid and make Chocolate sauce.

This website is pretty good too!


Original recipe from Martha Stewart! =)

Once again, halved the recipe to yield 10 large cookies. But I made it twice that night cause it was just that awesome.

1/2 cup all-purpose flour
1/4 cup unsweetened Dutch-process cocoa powder
1/4 teaspoon baking soda
1/4 teaspoon coarse salt
125g good-quality milk chocolate, 65g coarsely chopped and 60g cut into 1/4-inch chunks(I just sub it with a hell lot of white chocolate chips.)
1/4 cup (60g) unsalted butter
3/4 cups sugar (I reduced it to 1/2 cup)
1 large eggs
1 teaspoon pure vanilla extract


Preheat the oven to 170deg C! Melt the chocolate and butter. I did it over a double boiler (read This website)


Sift together the flour, baking soda, salt, cocoa powder.


Beat the egg, vanilla and sugar together until incorporated.


Then pour the melted chocolate-butter mixture with the egg-sugar-vanilla mixture and chuck them all into the flour mixture. Stir them up!


Then mix in an insane amount of chocolate chips. I threw in at least 1/2 cup of them..


Customary finger test! Now I gotta warn you though. My finger test turned into a spooning session and I think I lost at least 2 cookies here... It was that darn good.

Leave about 2cm space around each plonk of dough because the cookies will rise and puff a little. Bake em for 15 minutes.


Pressure points and top tips! (from trial and error) =D


1) Ok there is nothing to share about these cookies actually. Its so straightforward. Just watch out for the melting chocolate part as indicated by the websites I shared above.

2) Share them of course. Mindblowing stuff.

Search This Blog

Followers